Earlier this week I shared my favorite paint supplies, which was all in preparation for today's post {and entertainment center reveal}. I know there are a lot of friends out there that are looking to makeover a piece of thrifted or outdated piece of furniture, and are just having a hard time taking the plunge. I think the first piece I ever painted, I did ALL wrong. No primer. Brush streaks and drips... but, I learned. I learned that the next time I better do my research, lol. And as much as I have done research on painting, I still feel like I grow a little more each time I do it. {If you are wondering how we painted our trim, cabinets and doors, you can check out that post here.}
For this project, this crazy big lovely Craigslist find was my victim.
We started out by taking everything off, removing shelves and cabinet doors...
And finding dust, Legos and Lincoln logs under and behind the piece that has been sitting for a year without being moved...
Step one is to wipe everything down to ensure there is no dust on the piece.
Because the piece itself was in great shape, I opted to skip the sanding step. However, if you have a piece that has rough patches or imperfections, sanding is a good step to include.
I went straight to priming. I really like Zinsser Cover Stain Oil Based Primer {and no, I didn't get a dented can discount, I tried...}:
I use inexpensive brushes with the oil based primers, since they aren't all that easy {or fun} to clean, and after a couple of uses, they typically end up being discarded.
Thin, even coats are key. I start with the outside frame....
And then use a small foam roller for the larger, smooth surfaces:
Don't panic when you prime and see brush marks. This is OK with primer. The photo above is a picture of our piece all finished up and drying the recommended time before we began coating with paint.
A quick sanding with a fine grit wedge in-between coats will also help with any imperfections you find {not sure which grit to use? This will help you}.
For this project, I just ran to the local Ace Hardware and picked up some of their wall and trim paint:
I like to paint furniture in a satin finish and always use a latex enamel. Again, just follow the instructions on the can as far as how often you can re-coat.
Speaking of, I did two coats on this project. Nice, thin, even coats...
Coat 1:
Still streaky, but those streaks were completely M.I.A. after the second coat:
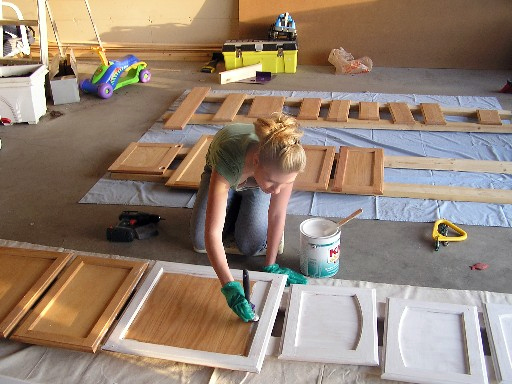
When it came to the cabinet doors, I forgot to photograph that process, but I did it just like I did with our kitchen cabinets...
Lay out drop cloths, place cabinet doors on 2x4's and prime, sand and paint just like you do the other parts of the furniture piece. Wait for the coats to cure before flipping and repeating on the other side.
In the photo above, you could see how I used the painters tape to tape out the new blue backdrop, which took not one...
But two coats as well. Don't forget you can wrap your brush in plastic wrap in-between coats!
To finish things off, three very thin coats of Minwax Polycrylic to protect all of that hard work!
We always wait and wait {as hard as it is}, in between each coat of each step. This is important to allow everything to cure and be durable down the line. This whole project took me over a week from start to finish. I was SO excited to put it all back together!
Here are a couple more up close views:
LOVE the knobs. They were scored on clearance from Anthro for $3 each. So pretty!
For the shelves, I actually had forgotten about them until half way through. To speed things up a smidge, I just used a spray paint primer, which seemed to work just as well, and gave a nice even coverage. Then two coats of paint just like the rest of the piece.
As you can see, we also added a shelf above the TV, just using some left over trim and melamine board {also primed and painted}.
Here it is all loaded up!
The bins on the top shelf used to be brown... just given a quick coat of spray paint to freshen them up a bit!
Games got pared down to only ones we love, play and that have all pieces... Lego build buckets, a charging station for their DS's and their video games also live on the shelves. Speaking of video games, since two of the systems moved down stairs to the playroom, so did some of the games. To store them, I just removed the games from their original cases and popped them into slimmer jewel CD cases and into a media box. Easy for the kids to find things and maintain!
In the cabinets below, we keep those larger, more awkward shaped toys {the dot bins were DIY'd here}.
And the art is just some framed scrapbook paper and the freebie printable {which I downloaded here}:
Even with all of the blues, as much as I love how "pretty" it's looking, it's a space for three boys, so I have a few more tricks up my sleeve to make it feel like home for both them and the adults of the house. More to come!
For now, a glorious before and after!
Who else has recently tackled a piece of furniture? Did it make all of the difference in your space as well? Share your links and stories!


0 comments:
Posting Komentar