Tampilkan postingan dengan label Office. Tampilkan semua postingan

Selasa, 29 Januari 2013

Home Office Month: Let's Get This Party Started!

The day I have been waiting for all month long is finally here!  It's time to party, celebrate and share all of your successes and hard work this month!  I absolutely can't wait to see what you fine folks have been up to!


This month we have tackled our paper piles head on, managed our budgets, maximized our storage, organized our messy drawers, dared to DIY and played with crafts, papers, glues and paints!  I hope ya'll had as much fun as I did!


Above you can see the projects that I took on this month: Organizing Greeting Cards, Conquering Paper Piles, DIYing Drawer Dividers, Creating a Budget Binder, Labeling Cords and Creating a Place for Memos.

But enough about my projects.  This day is about YOU!


So LET'S GET THIS PARTY STARTED!  Whether you gave your office a face lift, organized a drawer, sorted your file cabinet, DIY'd a pencil holder or even added some inspirational art, I want to see it!  And of course I know how busy everyone is so this party is open for a good long month, which will hopefully give you time to finish up your projects or even whip up a few more based on the additional inspiration you found within the link ups!

A huge THANK YOU to everyone who participated, shared your ideas, tips and tricks this month!


Every month we are tackling different projects and spaces around the home, to get organized one space and one project at a time.  You can check out the introduction to Home Office month here.

Senin, 28 Januari 2013

Quick Tip: Cute Cord Labels

Our cords have some identity problems.  Wait, scratch that.  A certain little man should be locked up for snatching.  It seems every time I go to grab a charger cord, it has gone missing.  Little stinker.

We have a few good cord organizing systems... for most, we have charging stations where the cords stay put.  And for the others, I keep them stashed away in organized boxes I DIY'd awhile back.


The box works great for keeping those extra cords stored neatly away when it comes to the electronics we don't use on a daily basis {also keeping workspaces clutter free}.  However, for the cords that we travel with or that get moved around the home, sometimes it is a challenge to keep them order and know which cord belongs to which family member.  Especially when there are five people with similar electronics and devices.


Two of my favorite organizing products solved that problem in a jif!


Pretty washi tape combined with my handy label maker and now there is no question what the cord is for.


To make this awesomeness happen, I just wrapped the Washi tape around the cord and printed a label with my label maker onto clear label maker tape.  Then, I placed the label onto the Washi tape and done! 

For the cords that are mine, I made sure to use pretty flower tape, that way, my little youngster will hopefully avoid "mistakenly" grabbing mom's cords.


And for him.... I made it as clear as possible.


And, it's cute!  I thought I would be bothered by extra labels/tags on my cords, but I sorta love it!

Super quick, super easy and super effective!


Jumat, 25 Januari 2013

Studio Tweaking - Memo Board Happiness

My poor studio has been suffering as I hit a design mental road block.  I couldn't settle on a color scheme or find items that truly reflected my personality or vision for the space.  Unfortunately, the area is open to our lower level family room, which makes it a bit more tricky to go uber girly as I would like.  So, for months, it has been the drop zone, the room to pull from, the room with no direction.

After stumbling across the artwork of Michelle Armas, I knew it was exactly what I had been waiting for, and her art would be just the inspiration I needed.

{instagram}
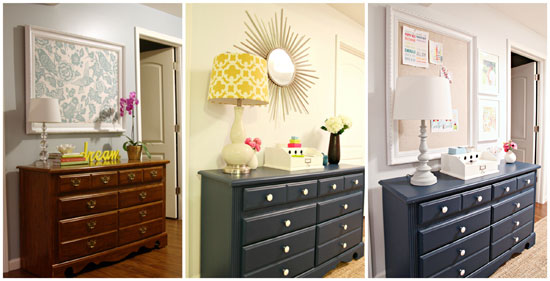
So, I took the first steps in adding some color to the space with the new artwork, and also felt the need to re-evaluate the space above the recently painted dresser.

Once upon a time, we used a giant ol' thrift store frame to create a pretty memo board.


And I used it and loved it.  But I also loved that frame and because my studio wasn't finished, I wasn't using it as much as I had originally hoped.  So, the frame started getting used around the house for other projects.  So, when you saw the painted dresser, the frame was no longer there....


But, now that I am re-invigorated to move forward with updating the space, organizing it for Home Office month and using it daily, I wanted that memo board to come back to its original home.


A little fabric update {simple linen to tone things down}, a swap from horizontal to vertical, a photo and the new artwork to the right and some white balance adjusting on my camera, and I now have a fresh new look!


I have been playing musical lamps lately and the lamp that once lived on the dresser now lives next to the sofa in the family room, so I "borrowed" Preston's lamp as a stand in until I can find my own, or a different one for him.

I am now playing with some ideas to update the paint color on the dresser, or to bring in a solid, beautiful wood console instead since I don't have any wood toned furniture in the studio and I think it is just what the space needs {there is and will be a lot of white with pops of color going on in the rest of the room and I could use the dresser in our master bedroom for linen storage}.  Until then, the deep blue already blends a bit nicer with the softer accents above.  Only time will tell...


The memo board is beautiful and although we just updated it this week, I am already having fun pinning up current color trends, cards received, color palette ideas, business cards, photos, etc...


Funny how a simple update can re-inspire one to dive back into a room makeover.


How about a fun progression shot to show what a few minor tweaks can do?


And here is the direction I am hoping to go with the studio, however, knowing me, it's very likely to continue to be "tweaked" as well.

{source: basket, console, lamp, memo board, chandelier, chair, rug, art, magazine file, stool}

What updates have you made this month, that are leaving you invigorated and excited to use your space?  Anyone else have a memo board and loooove it?

Selasa, 22 Januari 2013

Our Budget Binder

Last week I tackled our paper situation and I shared how I purged our piles and keep our papers in a few different places based on our needs.  Long term filing goes in a file box, tax items are stashed up in a cupboard in plastic envelopes, quick "To Do" type items go in easy to access file folders above my desk.  But what about the bills and budget items?  What were those binders for?


The red binder is our household management binder, which I shared how I use here.  The blue binder is our budget binder.  I took a chunk of my household binder and moved it into it's own happy place, since it just made more sense for how often we were using it.


Since I just printed out new pages at the beginning of the year, I thought it was the perfect time to photograph and share {since it is home office month and all, and it's a question I receive quite a bit}.

The budget binder is a tool that my husband and I both know how to use, reference frequently and both own and manage together.  He helped me come up with the contents to be sure we covered everything we thought we needed to successfully manage our budget.  Because we are not professionals, are constantly tweaking our system based on our needs and can't offer financial advice, all we can do is share bits of what is working for us.

And, since my mom always taught me it isn't polite to talk about money, I am only sharing an overview, not any specific digits.  You understand right?  You wouldn't want your personal budget information spread across the entire world wide web....

So, let's open up this pretty little lady and take a peek inside.


The inside of the binder holds two checkbooks; one for paying our monthly obligations and the other for our health savings account.  The pencil pouch holds our budget tools which consist of a calculator and pens.


The next pouch is where the paper is stored.  When the mail comes in, junk is recycled and bills, checks, etc... are placed into this pouch right away so we always have what we need when it comes time to pay our monthly bills.  This is also where we place any receipts that we may need to reconcile with our checkbook register when the time comes.


The rest of the tabs are labeled for quick reference.


We print out a checkbook register for the inside of the binder where we can keep track of our checking account.  It is much nicer than trying to use the smaller one that comes with the checkbook.  And since we really only use our checkbook when we are managing our budget each month, we have no need to take the register with us.

And due to popular demand, I have created a freebie checkbook register printable for you as well!

{click HERE to download your FREE copy of the checkbook register printable}

I also get asked frequently how we keep track of our monthly bills.  Since they don't change much from month to month, we list them all out on our finance checklist.  Then, each month we go down the list, write in the amount we paid and check it off once we submit the payment online or once it has auto-withdrawn from our account.  This way, we can see how it may vary from month to month and be sure we aren't missing a payment along the way.


As I mentioned, each month the hubs and I sit down and do our monthly budget together.  We use our income from the previous month to plan our the current month's budget.  Go down our list of budget items and "zero" out our account.  Meaning, we budget to zero and try and plan for everything that may come up throughout the month.  This is everything from savings to donations to gifts to clothing to school lunches.


We also go back to our budget from the previous month to be sure we put in our actual and make note of the differences.

Because I was never all that great about checking my checkbook register and online banking on a daily basis {I always found better things to do}, we decided that moving to a cash system would be beneficial.  It also hurts a bit more to hand over a dollar bill instead of a check card.  We only use cash for typical monthly expenses, such as fuel, groceries, household items, entertainment, etc....


To keep us on track of our weekly cash spending, we just started to do a weekly check-in, where we can jot down where we are at and keep our cash spread out evenly over the course of the month.

And also by popular demand, another freebie!

{click HERE to download your FREE copy of the cash check-in printable}

When we moved to the cash system, my biggest concern was carrying it.  We don't carry it all at once, I only carry a small amount at a time and keep it with any coupons and store gift cards that we also have under that category.  That way, when we need gas, I can use the cash and a $.06 off per gallon coupon at the same time.  I found the cash envelope from this super cute Etsy shop here.


I have tried a few online programs to manage our accounts and money, but at the end of the day they never seemed to do everything we were looking for.  So, although what we do may seem a little complex and overdone, it's what is working for us and keeps us on track.  And, since we now have a system and a groove, it really doesn't take all that much time to budget and schedule bills twice a month and do a quick weekly check-in.

So that is how we manage our bill paying and budget paper piles.  Surprise surprise, in a handy dandy binder.

Who is having fun with home office month?!  Link party is coming up soon and I am getting giddy with anticipation to see what you crazy kids have been up to!

Jumat, 18 Januari 2013

DIY Cereal Box Drawer Dividers

Home Office month is in full swing!  And it's not just about the papers.  And paper piles.  And filing.  And paying bills.  It's also about the area you do your work within.


My desk is pretty neat and tidy and I have been really happy with how the organization has held up over the last year plus, however, there was one drawer....

It used to look nice and lovely!  My favorite acrylic drawer organizers and all!


But then one day, I decided I would rather use the acrylic dividers in my vanity for a fun project, and that I would address the desk drawer at a later date.  Almost five months later, it was time.  Here is a true life story of how drawers can suffer once dividers go bye bye:


Eeek!  Dumping ground!  Everything I use at my desk was being tossed right into the drawer.  I couldn't even tell ya what was at the bottom of the messy mess.  At least my pencil pouch was sort of acting like a divider, no?

Thank goodness for this month's challenge, because I am beyond words smitten with the outcome of my little drawer organizing project.  Here is what I used to DIY some super cute drawer organizers:


Pretty papers, {both wrapping and decorative cardstock}, regular tape and double-sided, pencil, scissors, box cutter and a yard stick.

Over the last couple of weeks, I have been collecting leftover food boxes such as those from cereal, waffles and granola bars.  Once I had enough to play with, I popped them into the drawer to see how I could use them as dividers to reorganize my madness.


Once I had my desired location for each of the boxes, I used the drawer as a guide to mark the height around each edge of each box.


Then, using the box cutter, I cut the boxes!


The next step was to slice down the decorative paper {any pretty paper will do}.


There are plenty of ways to wrap a box with paper, and after a few completed dividers I definitely had a system going.

I started by using a thin strip across the bottom, attaching it to the box with double sided tape.


Then I used a pencil eraser to push in the creases around the inside edges {carefully so the paper wouldn't tear}.

Once the first strip was taped down nice and tight, I repeated the same step the opposite direction.


Again, pushed in the inside edges with a pencil eraser and taped it all down.  I did find that it was easiest to do my creases/folds before taping, vs. trying to work around the tape.


All done!


Love polka-dot.  Seriously, obsessed lately.

Anywho.  Here they are all together in their happy new home.


So cute I could barely stand it!  I didn't even want to fill them up they were so darling!  Love love lovity love!


But, after oohing and aahing for a little bit, I refocused and started organizing.  I purged, put things back where they belonged and the rest of the items found themselves in their new brightly colored cereal box drawer organizers.


Everything had a home and was paired with like items.  Oh happy day!  No more messy drawer!


And just because I know you all want to see it in it's real live location, here is what I get to peek at now when I am working away and need to grab some hand cream or a highlighter:


One of my favorite projects yet and all using materials I already had and re-purposing food boxes.  Who knew?

I will always have a love for acrylic drawer dividers, but I now also have a new found love for leftover food packaging too!

What out of the ordinary objects do you use to keep your drawers tidy?  Yogurt cups?  Flea market bowls?  Shoe boxes?